Sprouting has taken the health industry by storm as of late as sprouts are functional foods that you can grow indoors with very little effort and have health-promoting benefits that help to lower the risk of many diseases. Contrary to popular belief, sprouting has absolutely nothing to do with Brussel Sprouts being discarded from Christmas dinner plates by mischievous children to the dog beneath the tablecloth!
Sprouted seeds and greens contain more vitamin C, B vitamins and antioxidants at higher concentrations due to the sprouting process which releases enzymes from within in the plant that break down phytates – something that we naturally lack ourselves. So follow me on this journey as I try out sprouting for the very first time…

Edible sprouts include alfalfa, broccoli, mung bean and radish sprouts to name but a few and are an excellent source of antioxidants, essential amino acids as well as vitamins and minerals. As I mentioned, sprouting is something that I haven’t tried to do at home before, as although I’ve grown fruit and vegetables in the garden, aside from a broad bean in a jar for the children’s school projects we’ve never grown a crop outside of soil.
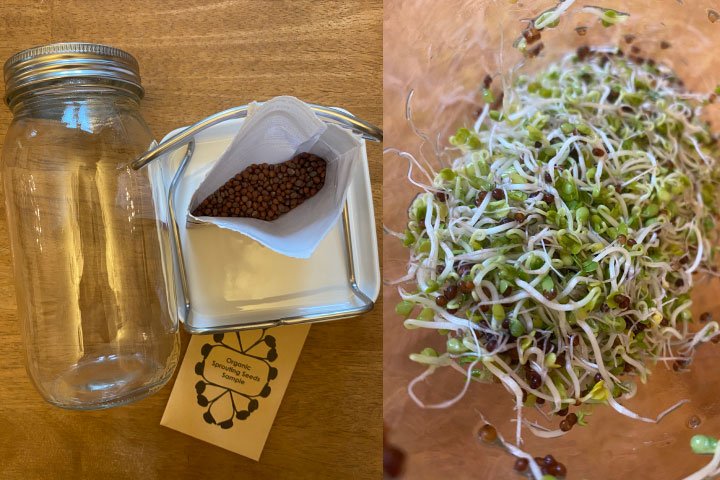
Having looked into the various methods of tray sizes and jars used for sprouting, I decided to settle on two ventilated glass sprouting jars and stands which are made specifically for this purpose. The factors which swayed me to choose a jar rather than traditional seed trays were; starting out with small batches, having a limited window ledge space, two inquisitive cats who eat anything left uncovered and sticky fingered children. So these self-contained, small footprint glass jars can sit rather pleasantly on the kitchen window ledge without looking out of place.

I was motivated to try sprouting for the first time by Brian Clement when I attended his Self Healing Diet book tour in London and better understood the healing powers of consuming natural raw foods. On my train journey home I conducted my research into the best containers and home sprouting setup to use, ordering it online and within a few days was able to begin my very first crop.
It’s incredibly simple to get started with sprouting as you only need 1-2 tablespoons of sprouting seeds per crop depending on your container size. I use one tablespoon per jar and it makes a huge amount. A seed pouch came with each of my sprouting jars along with a ceramic drip tray and angular metal stand, however you can buy these items separately if you want to. I also purchased a couple of additional seed varieties from my local supermarket for £2.50 each which are listed under Micro Greens and are radish and chard to accompany my organic broccoli raab and alfalfa seeds.

The process begins by soaking a tablespoon of seeds in the sprouting jar for 12hrs – although larger seeds may take longer to soak. I filled the jar with a few inches of water as the seeds bobbed about in the bottom. The top of the jar features a removable mesh sieve which allows you to rinse and drain your seeds without losing any. You could just use an ordinary sieve for this, but as the seeds are rinsed daily its much quicker and more convenient to have them in a sealed space.
Once the seeds have been soaked they’re rinsed off in cold water which I do by swilling them around in their jar before tipping it upside down to drain off. Giving them a good shake removes any access water and any left on the seeds can drain out once placed on the angled stand.

The sprouts have to be rinsed once or twice each day with water to prevent bacteria from growing on them and can be covered with a tea towel or paper towel to remove light to enable them to sprout. The sprouts burst out of the shell within the first day or so and progressively grow bigger and longer until white stalks and green leaves fill the jar.
Most sprouts are ready to eat from days 4 or 5 and the sprouts will turn green when moved into the light. You needn’t do anything to them for them to be ready to eat as they are supposed to be consumed raw to preserve their nutrients.

Seeing as my lunch today was spinach on toast with a mug of green tea, I decided to add my broccoli raab sprouts as a garnish and they tasted delicious! Much as you would add herbs and a side salad to a meal, sprouts can be used in exactly the same way.
They’re also delicious just as a snack on their own as they taste very similar to broccoli and spinach with a hint of mustard greens and a slight nutty sweetness. A beautiful little health kick to my day that brings life to my kitchen and makes me all the more mindful to eat raw whenever possible. All in all an uplifting experience that I highly recommend to all ages and culinary abilities.
